Vickers Hardness Testing
Microhardness testing of metals, ceramics, and composites is useful for a variety of applications for which 'macro' hardness measurements are unsuitable: testing very thin materials like foils, measuring individual microstructures within a larger matrix, or measuring the hardness gradients of a part along the cross section. Microhardness testing per ASTM E-384 gives an allowable range of loads for testing with a diamond indenter; the resulting indentation is measured and converted to a hardness value. The actual indenters used are Vickers (more common; a square base diamond pyramid with an apical angle of 136°) or Knoop (a narrow rhombus shaped indenter). The result for either Vickers or Knoop microhardness is reported in kg/cm2 and is proportional to the load divided by the square of the diagonal of the indentation measured from the test.
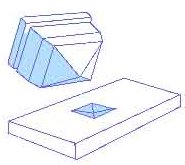
The figure below, courtesy of NewAge Instruments, shows the Vickers indenter geometry.
 |
Vickers Indentation
The figure at the left is a schematic diagram the square base diamond pyramid Vickers hardness indenter and sample indentation. |
The load on the Vickers microhardness indenter usually ranges from a few grams to several kilograms. In contrast, 'Macro' Vickers loads vary from 1 to 120 kg. The indentations should be as large as possible, within the confines of sample geometry, to minimize errors in measuring the indentation (hence the reported hardness). Vickers hardness is also sometimes called Diamond Pyramid Hardness (DPH) owing to the shape of the indenter.
Test samples should have a smooth surface and be held perpendicular to the indenter. All things being equal, a lighter indenter load will require a smoother surface for a satisfactory test. Samples are usually mounted in plastic to fix them during preparation and testing.
Other hardness topics in MatWeb:
